ImageView and ImageButton in Android
mageView and ImageButton are used in Android application to place an image in the view. ImageButton is used to use an image as a button in your android application.
To get more tutorials visit android course online Blog
ImageView in Android
ImageView is used to show any picture on the user interface.
Following are some of the main attributes that are most commonly used:
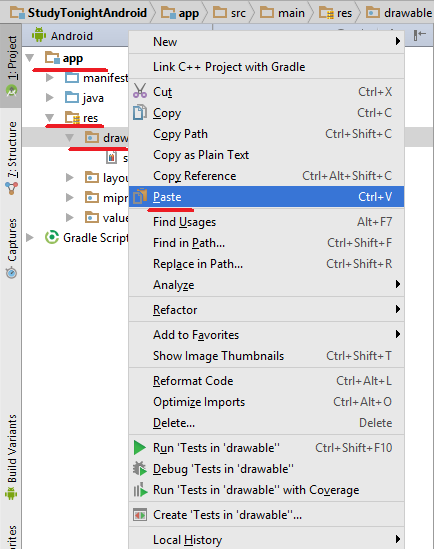
AttributeDescriptionandroid:maxHeightUsed to specify a maximum height for this view.android:maxWidthUsed to specify a maximum width for this view.android:srcSets a drawable as the content for this ImageView.android:scaleTypeControls how the image should be resized or moved to match the size of the ImageView.android:tintTints the color of the image in the ImageView.Therefore, any image that we want to display in the app should be placed under the drawable folder. This folder can be found under app → res → drawable. To insert an image, simply copy the image and then right click on drawable → Paste.

Following is the code which we need to add into the layout XML file to add an ImageView to our app screen.
<ImageView
    android:id="@+id/img"
    android:layout_width="match_parent"
    android:layout_height="wrap_content"
    android:scaleType="fitCenter"
    android:src="@drawable/img_nature"/>

A few more, commonly used attributes with ImageView
Following are some of the commonly used attributes:
android:background: This property gives a background color to your ImageView. When your image is not able to entirely fill the ImageView, then background color is used to fill the area not covered by the image.android:padding: To provide padding or extra space inside the ImageView for the image.
All scaleType in ImageView
Here we have specified all the possible values for the attribute scaleType which can be used in your app for ImageView:
- CENTER: Places the image in center, but does not scale it.
- CENTER_CROP: Scales the image uniformly.
- CENTER_INSIDE: This will place the image inside the container and the edges of the image will not overlap with that of the container, the image will be inside it.
- FIT_CENTER: Scale the image from the center.
- FIT_END: Scale the image from the end of the container, i.e from the right hand side.
- FIT_START: Scale the image from the start of the container, i.e from the left hand side.
- FIT_XY: This will fill the complete container with the image. This generally distorts the image by stretching/sqeezing it in disproportionate ratios.
- MATRIX: Used to scale the image using the image matrix when drawing.
Using an Image as Button
ImageButton has the same property as ImageView. Only one feature is extra, which is, images set through ImageButton are clickable, and actions can be attached with them upon clicking.Here is how you define an ImageButton in the layout XML file:
<ImageButton
    android:id="@+id/imgButton"
    android:layout_width="match_parent"
    android:layout_height="wrap_content"
    android:scaleType="fitCenter"
    android:src="@drawable/img_nature"/>
Just like a button, the setOnClickListener() can be used to set an event listener for click event on this.
imageButton = (ImageButton)findViewById(R.id.imgButton);
imageButton.setOnClickListener(new View.OnClickListener() {
    @Override
    public void onClick(View v) {

        // do anything here

    }
});
To learn complete course visit OnlineITGuru's android online training Blog
Comments
Post a Comment